End-to-End Computer Vision API, Part 3: Remote Experiments & CI/CD For Machine Learning
This is the last part of a three-part series of posts:
- _Part 1: [Data Versioning and ML
Pipelines](/blog/end-to-end-computer-vision-api-part-1-data-versioning-and-ml-pipelines)_
- _Part 2: [Local
Experiments](/blog/end-to-end-computer-vision-api-part-2-local-experiments)_
- Part 3: Remote Experiments & CI/CD For Machine Learning (this post)
In part 1, we talked about exploratory work in Jupyter Notebooks; versioning data in remote storage with DVC; and refactoring the code from Jupyter Notebooks into DVC pipeline stages.
Part 2 talked about the process of managing experiments with DVC pipelines, DVCLive and Iterative Studio.
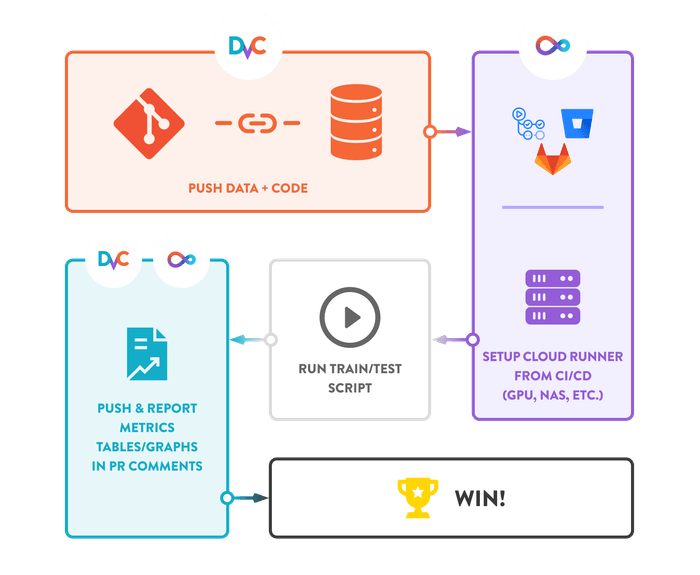
In this final part, we will focus on leveraging cloud infrastructure with CML; enabling automatic reporting (graphs, images, reports and tables with performance metrics) for PRs; and the eventual deployment process.

Leveraging Cloud Resources with CI/CD and CML
If you use the CML library in combination with CI/CD tools like GitHub Actions or GitLab CI/CD, you can quickly and easily:
- provision a powerful virtual machine (VM) in the cloud as training Computer Vision (CV) models often requires powerful GPUs rarely available on local machines
- submit your ML training job to it
- save the results (metrics, models and other training artifacts)
- automatically shut down the VM without having to worry about excessive cloud bills
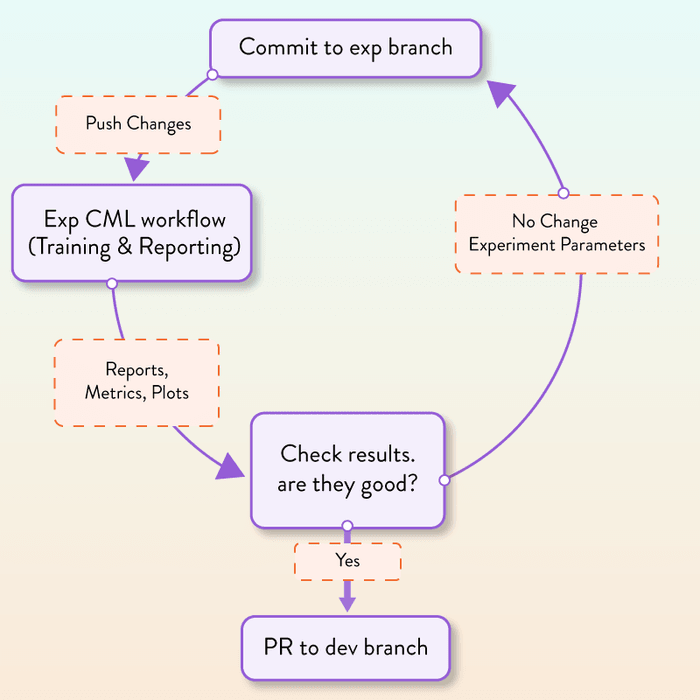
We've configured three workflow files for GitHub Actions, each of which corresponds to a particular stage depending on the project's lifecycle we are in:
1. Workflow for experimentation and hyperparameter tuning
a) provision an EC2 virtual machine with a GPU in AWS:
- name: Deploy runner on AWS EC2
  env:
    REPO_TOKEN: ${{ secrets.PERSONAL_ACCESS_TOKEN }}
  run: |
    cml runner \
        --cloud=aws \
        --cloud-region=us-east-1 \
        --cloud-type=g4dn.xlarge \
        --labels=cml-runner
b) deploy our experiment branch to a Docker container on this machine:
train-model:
  needs: deploy-runner
  runs-on: [self-hosted, cml-runner]
  container:
    image: iterativeai/cml:0-dvc2-base1
    options: --gpus all
  environment: cloud
  permissions:
    contents: read
    id-token: write
  steps:
    - uses: actions/checkout@v2
c) rerun the entire DVC pipeline and push metrics back to GitHub:
- name: dvc-repro-cml
  env:
    REPO_TOKEN: ${{ secrets.PERSONAL_ACCESS_TOKEN }}
  run: |
    # Install dependencies
    pipenv install --skip-lock
    pipenv run dvc pull
    pipenv run dvc exp run
    pipenv run dvc push
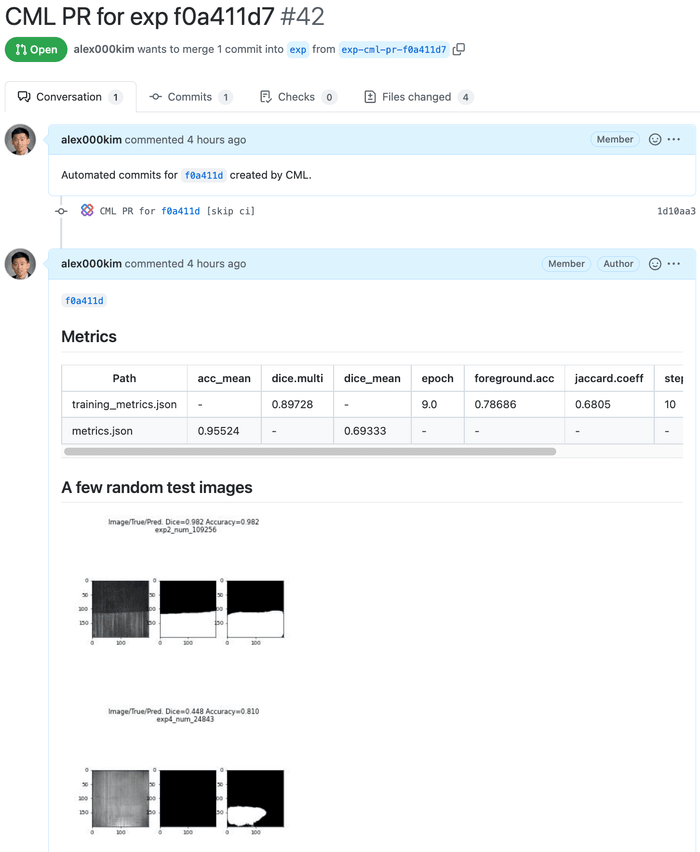
d) open a pull request and post a report to it that contains a table with metrics and model outputs on a few test images:
# Open a pull request
cml pr dvc.lock metrics.json training_metrics.json training_metrics_dvc_plots/**
# Create CML report
echo "## Metrics" > report.md
pipenv run dvc metrics show --md >> report.md
echo "## A few random test images" >> report.md
for file in $(ls data/test_preds/ | sort -R | tail -20); do
  cml publish data/test_preds/$file --md >> report.md
done
cml send-comment --pr --update report.md
The report structure is fully customizable. Below is an example of what the PR and the CML report would look like in this case. The test images show (from left to right) input images, ground truth masks and prediction masks.
At this point, we can assess the results in Iterative Studio and GitHub and decide whether we want to accept the PR or keep experimenting.
2. Workflow for deploying to the development environment
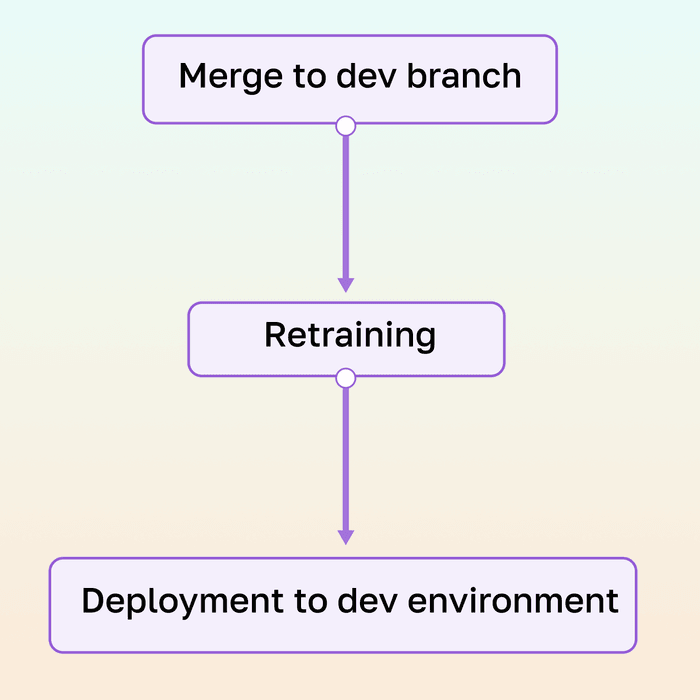
a) retrain the model if the dev branch contains changes not present in the
exp branch. DVC will skip this stage if that's not the case. This step looks
almost identical to step (1.c) above (rerunning the pipeline & reporting metrics
on GitHub) in the above workflow.
b) deploy the web REST API application (that incorporates the new model) to a development endpoint on Heroku:
deploy-dev-api:
  needs: train-and-push
  runs-on: ubuntu-latest
  steps:
    - uses: actions/checkout@v2
    - uses: actions/download-artifact@master
      with:
        name: model_pickle
        path: models
    - uses: akhileshns/heroku-deploy@v3.12.12
      with:
        heroku_api_key: ${{secrets.HEROKU_API_KEY}}
        heroku_app_name: demo-api-mag-tiles-dev
        heroku_email: 'alexkim@iterative.ai'
        team: iterative-sandbox
        usedocker: true
The development endpoint is now accessible at
https://demo-api-mag-tiles-dev.herokuapp.com/analyze (note -dev),
and we can use it to assess the end-to-end performance of the overall solution.
If we pick a random test image exp3_num_258558.jpg,
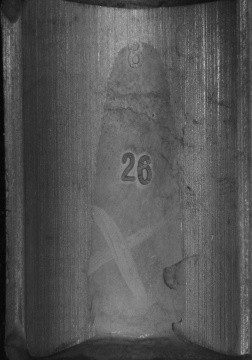
exp3_num_258558.jpg
we can send it to the endpoint using the curl command like this:
$ curl -F 'image=@data/MAGNETIC_TILE_SURFACE_DEFECTS/test_images/exp3_num_258558.jpg' \
-v https://demo-api-mag-tiles-dev.herokuapp.com/analyze
This will return some http-header info and the body of the response containing
the defect segmentation mask (0 for pixel locations without defects and 1
otherwise):
*   Trying 18.208.60.216:443...
* Connected to demo-api-mag-tiles-dev.herokuapp.com (18.208.60.216) port 443 (#0)
...
{"pred":[[0,0,0,0,0,0,0,0,0,0,0,0,0,0,0,0,0,0,0,0,0,0,0,0,0,0,0,0,0,0,0,0,0,0,0,0,0,
0,0,0,0,0,0,0,0,0,0,0,0,0,0,0,0,0,0,0,0,0,0,0,0,0,0,0,0,0,0,0,0,0,0,0,0,0,0,0,0,0,0,
0,0,0,0,0,0,0,0,0,0,0,0,0,0,0,0,0,1,1,1,1,1,1,1,1,1,1,1,1,1,1,1,1,1,1,1,1,1,1,1,1,1,
1,1,1,0,0,0,0,0,0,0,0,0,0,0,0,0,0,0,0,0,0,0,0,0,0,0,0,0,0,0,0,0,0,0,0,0,0,0,0,0,0,0,
Alternatively, we can do a similar thing with a Python script that also saves
the output mask into a exp3_num_258558_mask.png image:
import json
from pathlib import Path

import matplotlib.cm as cm
import matplotlib.pyplot as plt
import numpy as np
import requests

url = 'https://demo-api-mag-tiles-dev.herokuapp.com/analyze'
file_path = Path(
    'data/MAGNETIC_TILE_SURFACE_DEFECTS/test_images/exp3_num_258558.jpg')
files = {'image': (str(file_path), open(file_path, 'rb'), "image/jpeg")}
response = requests.post(url, files=files)
data = json.loads(response.content)
pred = np.array(data['pred'])
plt.imsave(f'{file_path.stem}_mask.png', pred, cmap=cm.gray)
Below you can see what this mask looks like.

exp3_num_258558_mask.png
Before we merge the dev branch into the main branch, we would need to thoroughly test and monitor the application in the development environment. A good test could be duplicating real image requests to the dev endpoint for some period of time and assess the quality of the returned segmentation masks.
3. Workflow for deploying to the production environment
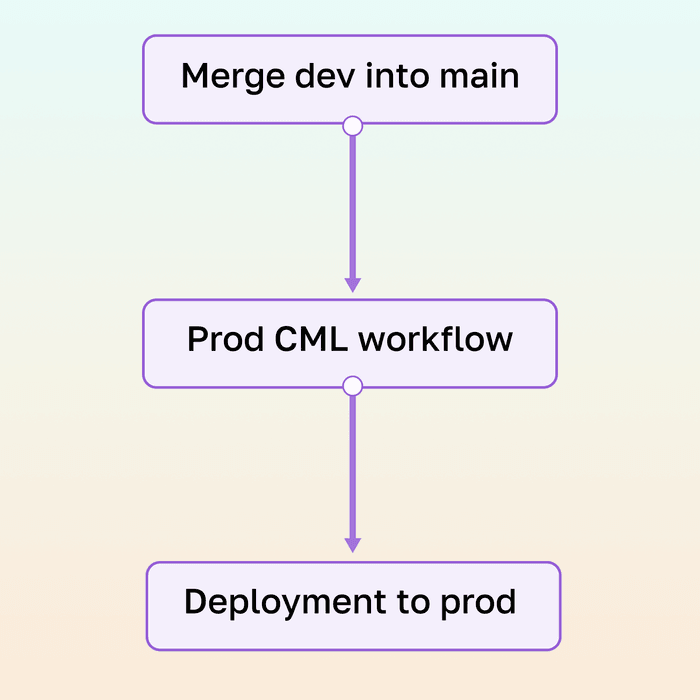
If there are no issues and we are confident in the quality of the new model, we can merge the development branch into the main branch of our repository. Again, this triggers the third CI/CD workflow that deploys the code from the main branch to the production API. This looks identical to the deployment into the development environment, except now the deployment endpoint will be
https://demo-api-mag-tiles-prod.herokuapp.com/analyze (note -prod).
Summary
In this series of posts (see Part 1 and Part 2), we described how we addressed the problem of building a Computer Vision Web API for defect detection. We’ve chosen this approach because it addresses the common challenges that are shared across many CV projects: how to version datasets that consist of a large number of small- to medium-sized files; how to avoid triggering long-running stages of an ML pipeline when it’s not needed for reproducibility; how to run model training jobs on the cloud infrastructure without having to provision and manage everything yourself; and, finally, how to track progress in key metrics when you run many ML experiments.
We've talked about the following:
- Common difficulties when building Computer Vision Web API for defect detection (link)
- Pros and cons of exploratory work in Jupyter Notebooks (link)
- Versioning data in remote storage with DVC (link)
- Moving and refactoring the code from Jupyter Notebooks into DVC pipeline stages (link)
- Experiment management and versioning (link)
- Visualization of experiments and collaboration in Iterative Studio (link)
- Remote experiments, CI/CD, and production deployment (this post)
What to Try Next
Missed the previous parts of this post? See Part 1: Data Versioning and ML Pipelines and Part 2: Local Experiments.
- Reproduce this solution by setting your own configs, tokens, and access keys for GitHub, AWS, and Heroku
- Add a check to merge PRs automatically if the metrics have improved
- Add a few simple unit tests and insert them into CML workflow files so they run before reproducing the pipeline
- Apply this approach to a different Computer Vision problem using a different dataset or different problem type (image classification, object detection, etc.)

